I've been developing for NRefactory several years now after the roslyn release I made a new 6.0 version. For the 6.0 version there are bad and good news.
The bad news is that it's no longer in development.
The good news is that the successor of the refactoring part is (RefactoringEssentials). The rest of the code has been moved to the monodevelop source code and is still available and in active development as open source.
So the 5.0 version will remain - and will be still maintained a bit by Daniel Grundwald and me.
Why was this decision made ?
Mostly because most NRefactory6 code was just wrappers around internal roslyn classes (and making them public). I don't think that it's worth as a stand alone library.
Since #Develop was discontinued the 2nd big NRefactory user is no longer around and it's more time effective to move that code to monodevelop and split the refactorings so they can be used in VS.NET 2015 as well.
So I deleted the NRefactory6 today. Bye NRefactory we had a nice time - and hello RefactoringEssentials :)
Saturday, July 25, 2015
Wednesday, November 13, 2013
How to make Xamarin Studio sharper
One of the most demanded features of Xamarin Studio/MonoDevelop is static source analysis like ReSharper (if you're a VS.NET user and haven't heard about that tool - just buy it - you won't regret that decision).
What most Xamarin Studio users don't know is that they already have static code analysis. It is possible to get the same development experience in Xamarin Studio as well without buying any 3rd party addin. We had that feature since some releases but it's shaping up quite well now. With the latest 4.2 release it's really worth turning it on. You just need to:
Enable it through the IDE options:

Now after that notice that the scroll bar has been replaced with a new control:

If Xamarin Studio finds a possible issue in your code you can see it in that control. And directly jump to the location (or you can use the button at the top of the control - this button quickly shows the status of the file - if there are any errors/warnings etc. - a click on that button takes you to the most urgent issue in that file).
The issues are marked in the text editor as well. Most issues are underlined - but there are other markers for example redundant code is grayed out:

Generally code issues in Xamarin Studio provide a resolution to fix them. Even for most common errors fixes are available. That's dramatically reducing development time.
A little marker appears when the caret is at the marked code. This indicates that a refactoring action is available - either press alt+enter to open the context sensitive refactoring menu or look in the context menu to perform the action.
But the IDE does even more: Quick fixes
If you're not at a code issue that marker appears for various constructs - it shows that refactoring actions are available which let you easily change code without typing.
There are hundreds of code actions and code issues available which make the daily work with Xamarin Studio a charm.
What most Xamarin Studio users don't know is that they already have static code analysis. It is possible to get the same development experience in Xamarin Studio as well without buying any 3rd party addin. We had that feature since some releases but it's shaping up quite well now. With the latest 4.2 release it's really worth turning it on. You just need to:
- Get the latest Xamarin Studio (or MonoDevelop) release - newer is always better
- Enable background source analysis
Not all users are familiar with source analysis is and how it works. Once used to that you'll never be able to program without it - it's almost as helpful as having code completion.
Background source analysis is like pair programming. That means that that two programmers work at one computer. And while the you write code the other will observe what you write any review each line you type.
Background source analysis is like pair programming. That means that that two programmers work at one computer. And while the you write code the other will observe what you write any review each line you type.
The IDE takes the part of the observer and reviews the written source code on the fly (but without eating your pizza).
That's a big deal - it's possible to track many problems the compiler doesn't find. Xamarin Studio looks over your code and helps to eliminate 'bad' code before it becomes a problem. It will reduce development time dramatically and shows problems before compilation. And it'll make your code look really professional by giving good hints.
Enable it through the IDE options:

Now after that notice that the scroll bar has been replaced with a new control:

If Xamarin Studio finds a possible issue in your code you can see it in that control. And directly jump to the location (or you can use the button at the top of the control - this button quickly shows the status of the file - if there are any errors/warnings etc. - a click on that button takes you to the most urgent issue in that file).
The issues are marked in the text editor as well. Most issues are underlined - but there are other markers for example redundant code is grayed out:
Generally code issues in Xamarin Studio provide a resolution to fix them. Even for most common errors fixes are available. That's dramatically reducing development time.
A little marker appears when the caret is at the marked code. This indicates that a refactoring action is available - either press alt+enter to open the context sensitive refactoring menu or look in the context menu to perform the action.
 |
| Action marker over a code issue |
But the IDE does even more: Quick fixes
If you're not at a code issue that marker appears for various constructs - it shows that refactoring actions are available which let you easily change code without typing.
There are hundreds of code actions and code issues available which make the daily work with Xamarin Studio a charm.
Thursday, September 5, 2013
How I set up MonoDevelop on Linux
Mono and Linux is a complex story - currently the fact is that no mainstream Linux distribution gives you the most recent .NET development tools (yes I know about arch - I can recommend using arch or manjaro if you want 'the easy way'). Most of us Linux users can be happy if your Linux distribution has a mono run time from this decade.
MonoDevelop runs on Linux quite well (in case you use a light theme - see MonoDevelop 4.0 and dark themes). Many developers from Xamarin are Linux users and run MonoDevelop on Linux every day (but without a dark theme :)).
It is possible to get a very good looking monodevelop environment on Linux as well. I'll try to explain how I do it and show a screenshot as 'proof of concept' :)
First you need a script for 'switching' to the parallel environment. I use this script for doing it:
The best way is to build mono, gtk# (gtk-sharp-2-12-branch) and gnome-sharp from the sources found on github(I hope you're familiar with git):
https://github.com/mono/mono
https://github.com/mono/gtk-sharp
https://github.com/mono/gnome-sharp
For building mono & gtk-sharp your distribution needs some prerequisites - either you follow what the configure/bootstrap scripts tell you or try something like sudo apt-get build-dep monodevelop (Note: On current ubuntu/monodevelop you'll need more packages like libtool but the build scripts will tell you what's needed).
You need to run the configure/bootstrap scripts with the option --prefix=/opt/mono - and then it installs 'as usual' with make/make install.
And just run it with "make run" - that's all.
Some tips: Adjust the fonts (I use Source Code Pro for the text editor and Source Sans Pro almost everywhere else).
Get the Xamarin gtk theme from https://github.com/mono/xamarin-gtk-theme (you may need to set the prefix here to --prefix=/usr) and enable it in Environment->Language.
The end result should like this:

Ok I agree that there is a drawing error in the tab bar - but that's due a graphic device driver bug (it should render a horizontal linear gradient - chrome tabs suffer from the same bug on my machine).
sudo apt-get install autoconf libtool-bin libglade2-dev libgnomeui-dev cmake libssh-dev libssh2-1* nuget mono-devel git intltool curl
git clone https://github.com/mono/mono
cd mono
./autogen.sh --prefix=/opt/mono
make get-monolite-latest
make; sudo make install; cd ..
git clone --branch gtk-sharp-2-12-branch https://github.com/mono/gtk-sharp.git
cd gtk-sharp
./bootstrap-2.12 --prefix=/opt/mono
make; sudo make install; cd ..
git clone https://github.com/mono/gnome-sharp.git
cd gnome-sharp
# needed to edit Settings.cs atom ./sample/gconf/Settings.cs
./bootstrap-2.24 --prefix=/opt/mono
make; sudo make install; cd ..
git clone https://github.com/mono/xamarin-gtk-theme.git
cd xamarin-gtk-theme
./autogen.sh --prefix=/usr
make; sudo make install; cd ..
# Building monodevelop (git clone may be different for you)
git clone git@github.com:mono/monodevelop.git
cd monodevelop
./configure
make
make run
# INSTALL MSBUILD
# This is broken:
git clone https://github.com/mono/msbuild
cd msbuild
git checkout -b xplat-master origin/xplat-master
./cibuild.sh --scope Compile --target Mono --host Mono
git clone https://github.com/fsharp/fsharp
cd fsharp
./autogen.sh --prefix=/opt/mono
make; sudo make install; cd ..
# install PCL
# go to windows C:\Program Files (x86)\Reference Assemblies\Microsoft\Framework\.NETPortable
# the portable libraries should end up in /opt/mono/lib/mono/xbuild-frameworks/.NETPortable
# for me it looks like:
# /opt/mono/lib/mono/xbuild-frameworks/.NETPortable$ ls
# v4.0 v4.5 v4.6
# Building monodevelop (git clone may be different for you)
git clone git@github.com:mono/monodevelop.git
cd monodevelop
./configure
make
make run
MonoDevelop runs on Linux quite well (in case you use a light theme - see MonoDevelop 4.0 and dark themes). Many developers from Xamarin are Linux users and run MonoDevelop on Linux every day (but without a dark theme :)).
It is possible to get a very good looking monodevelop environment on Linux as well. I'll try to explain how I do it and show a screenshot as 'proof of concept' :)
Parallel Mono Environment
To get the latest mono you'll need to build a parallel mono environment. This is far easier than it sounds and wont affect the mono your distribution has. (But you need to install a mono in your distribution for building a mono from the repositories)First you need a script for 'switching' to the parallel environment. I use this script for doing it:
#!/bin/bash MONO_PREFIX=/opt/mono export DYLD_LIBRARY_PATH=$MONO_PREFIX/lib:$DYLD_LIBRARY_PATH export LD_LIBRARY_PATH=$MONO_PREFIX/lib:$LD_LIBRARY_PATH export C_INCLUDE_PATH=$MONO_PREFIX/include export ACLOCAL_PATH=$MONO_PREFIX/share/aclocal export PKG_CONFIG_PATH=$MONO_PREFIX/lib/pkgconfigexportMONO_TLS_PROVIDER=legacy PATH=$MONO_PREFIX/bin:$PATH
The best way is to build mono, gtk# (gtk-sharp-2-12-branch) and gnome-sharp from the sources found on github(I hope you're familiar with git):
https://github.com/mono/mono
https://github.com/mono/gtk-sharp
https://github.com/mono/gnome-sharp
For building mono & gtk-sharp your distribution needs some prerequisites - either you follow what the configure/bootstrap scripts tell you or try something like sudo apt-get build-dep monodevelop (Note: On current ubuntu/monodevelop you'll need more packages like libtool but the build scripts will tell you what's needed).
You need to run the configure/bootstrap scripts with the option --prefix=/opt/mono - and then it installs 'as usual' with make/make install.
Building MonoDevelop
Get monodevelop from https://github.com/mono/monodevelop then switch to your parallel mono environment and type inside the monodevelop directory: ./configure ; make
And just run it with "make run" - that's all.
Some tips: Adjust the fonts (I use Source Code Pro for the text editor and Source Sans Pro almost everywhere else).
Get the Xamarin gtk theme from https://github.com/mono/xamarin-gtk-theme (you may need to set the prefix here to --prefix=/usr) and enable it in Environment->Language.
The end result should like this:

Ok I agree that there is a drawing error in the tab bar - but that's due a graphic device driver bug (it should render a horizontal linear gradient - chrome tabs suffer from the same bug on my machine).
Conclusion
It's hard to get a .NET environment running on Linux these days - but it's doable :). Btw. we could need help improving the monodevelop Linux client - esp. dark theme support is lacking a bit :)
For the Lazy
Lately I've been reinstalling Ubuntu 17.10 and I did following (may be helpful):sudo apt-get install autoconf libtool-bin libglade2-dev libgnomeui-dev cmake libssh-dev libssh2-1* nuget mono-devel git intltool curl
git clone https://github.com/mono/mono
cd mono
./autogen.sh --prefix=/opt/mono
make get-monolite-latest
make; sudo make install; cd ..
cd gtk-sharp
./bootstrap-2.12 --prefix=/opt/mono
make; sudo make install; cd ..
cd gnome-sharp
# needed to edit Settings.cs atom ./sample/gconf/Settings.cs
./bootstrap-2.24 --prefix=/opt/mono
make; sudo make install; cd ..
git clone https://github.com/mono/xamarin-gtk-theme.git
cd xamarin-gtk-theme
./autogen.sh --prefix=/usr
make; sudo make install; cd ..
git clone git@github.com:mono/monodevelop.git
cd monodevelop
./configure
make
make run
# INSTALL MSBUILD
# This is broken:
git clone https://github.com/mono/msbuild
cd msbuild
git checkout -b xplat-master origin/xplat-master
./cibuild.sh --scope Compile --target Mono --host Mono
# Alternative - get an os x box grab msbuild from there and install and install it # in opt/mono/lib/mono/msbuild/15.0/bin/MSBuild.dll
sudo apt-key adv --keyserver hkp://keyserver.ubuntu.com:80 --recv-keys 3FA7E0328081BFF6A14DA29AA6A19B38D3D831EF
echo "deb http://download.mono-project.com/repo/ubuntu xenial main" | sudo tee /etc/apt/sources.list.d/mono-official.list
sudo apt-get update
sudo apt-get install msbuild
sudo cp -R /usr/lib/mono/msbuild/15.0 /opt/mono/lib/mono/msbuild
sudo cp /usr/bin/msbuild /opt/mono/bin
echo "deb http://download.mono-project.com/repo/ubuntu xenial main" | sudo tee /etc/apt/sources.list.d/mono-official.list
sudo apt-get update
sudo apt-get install msbuild
sudo cp -R /usr/lib/mono/msbuild/15.0 /opt/mono/lib/mono/msbuild
sudo cp /usr/bin/msbuild /opt/mono/bin
sudo mozroots --import --machine --sync
sudo certmgr -ssl -m https://go.microsoft.com
sudo certmgr -ssl -m https://nugetgallery.blob.core.windows.net
sudo certmgr -ssl -m https://nuget.org
cd fsharp
./autogen.sh --prefix=/opt/mono
make; sudo make install; cd ..
# go to windows C:\Program Files (x86)\Reference Assemblies\Microsoft\Framework\.NETPortable
# the portable libraries should end up in /opt/mono/lib/mono/xbuild-frameworks/.NETPortable
# for me it looks like:
# /opt/mono/lib/mono/xbuild-frameworks/.NETPortable$ ls
# v4.0 v4.5 v4.6
# Building monodevelop (git clone may be different for you)
git clone git@github.com:mono/monodevelop.git
cd monodevelop
./configure
make
make run
Friday, August 2, 2013
Unit test text editor integration
Writing unit tests should be easy and fun.
What bugs me about writing tests in Xamarin Studio is that testing requires a context switch.
I write my test and then I need to compile the test project and trying to search the test in the unit test pad (which doesn't support search - but that's another story :)).
What I really want is to be able to just run the test I'm working on. I don't need to run the full suite (that's what continuos integration is for) - just the current test.
I've been working on the solution: Unit test text editor integration.
This feature is not finished but it's already in the public repositories and I think Xamarin Studio 4.2 will contain it.
It's a bit hidden in the options - but once it's activated it makes life much easier:

After it's active a new margin appears in the text editor:

This margin parses the current file and marks all unit tests.
Clicking on one of these icons let the user choose to Run or Debug the tests. No write->build->search test in pad->run test->change test->repeat cycle anymore - just write->run test->repeat. This feature has made my life much more easier. See it in action: Demo video
Saturday, March 30, 2013
Code formatting with NRefactory
NRefactory is a library for parsing and analyzing C# source code hosted at GitHub.
It is a bit like Roslyn from Microsoft, but fully open source and free to use (MIT X11). It's possible to parse and analyze individual C# files or whole projects.
Mainly it was developed for IDEs therefore it has many high level features suited for development environments like type semantic highlighting, refactorings or code completion.
It provides almost everything needed for working with C# code.
 The self formatting source code - easy and without any external IDE.
The wrong space is finally gone. But the formatter has done something with the brackets. That's because of the options I gave to the formatter.
The C# formatter needs an options object that specifies how the C# code should be formatted. The CSharpFormattingOptions class provides a large set of very fine grained formatting options. The factory gives easy access to the most common indenting styles (see wikipedia). The Allman style is used in Visual Studio .NET which puts all braces on it's own line. That's why the formatter has altered the if brackets.
That's just one way to call the formatter. It was built for in IDE use.
The formatter can generate the minimum change set of replace operations required to do the formatting. Furthermore it's possible to format only a portion of the text inside a document. In monodevelop the on the fly formatter uses this functionality to provide formatting.
The formatting engine in NRefactory is mighty and easy to use - let me know if you find uses for it or have improvements.
The self formatting source code - easy and without any external IDE.
The wrong space is finally gone. But the formatter has done something with the brackets. That's because of the options I gave to the formatter.
The C# formatter needs an options object that specifies how the C# code should be formatted. The CSharpFormattingOptions class provides a large set of very fine grained formatting options. The factory gives easy access to the most common indenting styles (see wikipedia). The Allman style is used in Visual Studio .NET which puts all braces on it's own line. That's why the formatter has altered the if brackets.
That's just one way to call the formatter. It was built for in IDE use.
The formatter can generate the minimum change set of replace operations required to do the formatting. Furthermore it's possible to format only a portion of the text inside a document. In monodevelop the on the fly formatter uses this functionality to provide formatting.
The formatting engine in NRefactory is mighty and easy to use - let me know if you find uses for it or have improvements.
NRefactory get's used in SharpDevelop 5, MonoDevelop and Xamarin Studio for providing high level C# features. Even VIM got a C# plugin providing high level C# features: Omnisharp. I've seen many uses of the library in various non IDE releated projects like the Saltarelle C#->JavaScript compiler.
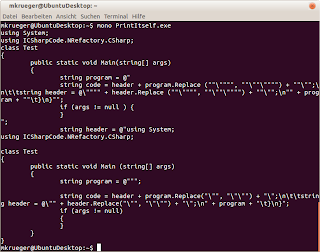
But I've never seen anyone using the C# formatter from nrefactory. The formatter provides rich formatting features and is very easy to use. Let's take an example. Today I wrote a piece of code using a text editor:As you see there is a space after the 'null' that shouldn't be there. I could've just removed the space and continue my work - but what would happen if I do it again ? Wouldn't it be nice if it could be auto formatted like in a IDE. Just make the code format itself!
First step - make the program print itself. For that I added some code around the if that repeats the program and prints it:
Now running the program on the console gives:

 The self formatting source code - easy and without any external IDE.
The wrong space is finally gone. But the formatter has done something with the brackets. That's because of the options I gave to the formatter.
The C# formatter needs an options object that specifies how the C# code should be formatted. The CSharpFormattingOptions class provides a large set of very fine grained formatting options. The factory gives easy access to the most common indenting styles (see wikipedia). The Allman style is used in Visual Studio .NET which puts all braces on it's own line. That's why the formatter has altered the if brackets.
That's just one way to call the formatter. It was built for in IDE use.
The formatter can generate the minimum change set of replace operations required to do the formatting. Furthermore it's possible to format only a portion of the text inside a document. In monodevelop the on the fly formatter uses this functionality to provide formatting.
The formatting engine in NRefactory is mighty and easy to use - let me know if you find uses for it or have improvements.
The self formatting source code - easy and without any external IDE.
The wrong space is finally gone. But the formatter has done something with the brackets. That's because of the options I gave to the formatter.
The C# formatter needs an options object that specifies how the C# code should be formatted. The CSharpFormattingOptions class provides a large set of very fine grained formatting options. The factory gives easy access to the most common indenting styles (see wikipedia). The Allman style is used in Visual Studio .NET which puts all braces on it's own line. That's why the formatter has altered the if brackets.
That's just one way to call the formatter. It was built for in IDE use.
The formatter can generate the minimum change set of replace operations required to do the formatting. Furthermore it's possible to format only a portion of the text inside a document. In monodevelop the on the fly formatter uses this functionality to provide formatting.
The formatting engine in NRefactory is mighty and easy to use - let me know if you find uses for it or have improvements.
Monday, February 25, 2013
Upcoming color importer
Many people requested it and in the next Version of Xamarin Studio it will become a reality:
You surely want such a pretty user interface for the IDE yourself and ask how to achieve this. It's easy to do see the little demo video I made to demonstrate how to import a color scheme (recorded on my linux desktop):
This feature is already pushed to the monodevelop git repository. In case you want to try it out you have to built MonoDevelop from the source. The Xamarin Studio users need to wait a bit longer we release a new version when it's ready.
We import all C#/HTML/XML/ASP.NET colors as well as some colors not defined by Studio Styles. It required some changes to our color scheme system which means that old scheme files are broken again. But I promise that it will be more stable in the future. The new format supports versioning and it's easier to extend it with new colors. The new color scheme system uses json to store the color schemes. Newer versions will be able to load old style files without breaking.
Visual Studio .NET schemes are imported on the fly and remain in the VS.NET format. This way improvements to the importer engine directly benefit previous imported color schemes. However when the user changes them in our scheme editor the format will get converted.
I would appreciate if I would get some feedback about this feature. I want it as perfect as possible.
The Visual Studio color importer !
Defining own color schemes is very painful it is much easier to use a pre defined scheme from Studio Styles. Now it is easy to do as well importing a visual studio color scheme. Now finally what once has been an April's fool joke can now become a reality:

Sunday, April 8, 2012
How To: Write a C# Issue Provider
Prerequisites
Introduction
A month ago I blogged about context actions using NRefactory. I got positive feedback about the new possibilities of context actions and we worked hard to improve the API and getting the NRefactory capabilities into Monodevelop.
In SharpDevelop the actions and issue providers are running too. With NRefactory as base we can share these features.
In SharpDevelop the actions and issue providers are running too. With NRefactory as base we can share these features.
And now we have a custom refactoring infrastructure that makes it easy to write actions and issue providers. A code issue doesn't just analyze one point in the file like the context actions it analyzes the whole file in a background thread and shows it's findings as underlines in the text editor and/or in the task bar.
Furthermore a code issue can provide a code action to fix the issue.
Furthermore a code issue can provide a code action to fix the issue.
In this post we'll create a code issue provider and the code action to fix that issue using the NRefatory API.
Writing the Code Issue Provider
I've decided to do what others already did (then you know that it works and is helpful)- creating a code issue provider for local variable declarations that can be converted to constants.
Look at that code:
In the code above pi is assigned to a constant value that never changes (I would recommend using Math.PI, but that's not part of this blog) and can be converted to a local constant:
For the analysis we need to do:
- Check that the variable declaration is not constant
- Check that all variables of the declaration have an initializer that is a constant expression
- Analyze the data flow to ensure that the variables are read only
Creating the provider class
A code issue provider needs to implement the ICodeIssueProvider interface. This is nothing more than yielding a list of all identified CodeIssues in a file. (In our case all variable declarations that can be made constant.)
For making the thing work in the IDE an IssueDescriptionAttribute gives all the information the IDE needs to display this issue.
In code that looks like the following one.
Code Issue logic
For analyzing a syntax tree it's a good approach to use the visitor pattern.
There is a pre defined visitior that is specialized in code issues. We just create a visitor to analyze the syntax tree that is handling variable declaration statements.
That looks like.
The VisitVariableDeclarationStatement is called for all local variable declaration statements and we need to analyze each of them, if they can be converted to a constant.
First we check, if the variable declaration is already a constant, if so we can safely ignore it:
After that we need to ensure that all variable initializers are constant. We need to resolve the initializers and determine, if the resolve result is a constant one:
Note that all elements in the syntax trees are always != null, therefore null checks are not needed. That makes writing refactoring less error prone. However relative nodes like the Parent or FirstChild can be null, otherwise it would break the tree structure. But never things like an embedded statement in an if. To mark that as 'not in ast' a null object is given back which can be checked with IsNull.
Now things become a bit more complicated because we need to analyze the data flow. We need to analyze the data flow from the declaration statement to the end of the containing block to ensure that the variable is never changed.
Thats what the definite assignment analysis is for. It determines the state of a variable at a given point. We can use SetAnalyzedRange to limit the analyzing range. That is needed because an initializer will always set the variable state and we need to know it the variable is set between its declaration and the end of the containing block. Thefore we calls SetAnalyzedRange with the variable declaration (excluded - an initializer always sets a variable) to the end of the containing block (included).
Then we just need to do is to ask the assignmentAnalysis, if a variable gets assigned in its life time.
Adding the issue and fix action
Now all necessary analysis is done. If the code hasn't returned the variable declaration statement can be made constant.
Now time for creating the code issue and a fix action. Note that the fix action is optional. The code issues share the code action infrastructure with the code actions.
The difference here is that the issue and fix action is added to a node in the syntax tree - in our case the variable declaration.
An action contains a script. This is basically an syntax tree transformation, but can contain more text editor like actions as well like activating a linked name mode in the text editor (for naming newly created variables for example).
In our case we just need to add a 'const' before the variable declaration. That would be fairly easy with a script.InsertBefore (varDecl, new CSharpModifierToken (Modifiers.Const)); call - but let's do it with a more complex syntax tree transformation.
We need to change the variable declarations modifiers. But the tree is immutable. However it is possible to clone an immutable node which can be altered. That's what we do - we clone the declaration, add a const modifier to it and replace the original variable declaration with it's altered version:
The TranslateString function should be used for all strings displayed (The IssueDescription is included as well) so that they're automatically added to our translation database.
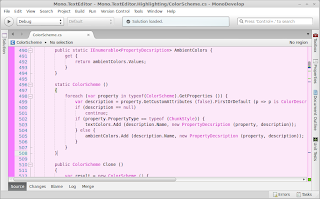
Whole source code
Here is the whole source code of the issue provider - it just takes 50 lines:
After adding this class to the NRefactory project and starting Monodevelop we'll have the code issue provider working inside the IDE:

And after the fix:

Now you've your first code issue provider using the NRefactory API that performs syntactic and semantic analysis and also changes code. Congratulations!
Subscribe to:
Posts (Atom)